
The Home Roaster's Guide
From Green Bean to Your Best Cup
1. Why Roast Your Own Coffee
If you've ever brewed a cup that tasted flat, thin, or missing something — the answer is almost always the same: stale coffee. Not old-stale, but roast-stale.
Here's what most people don't know: the coffee on grocery store shelves has usually been sitting in a warehouse for weeks or months before you open the bag. The volatile aromatic compounds that make great coffee great — the fruity esters, caramel sugars, floral top notes — fade fast. What's left is drinkable, but it's a shadow of what it could be.
Roasting your own coffee solves this completely. And it's far simpler than it sounds.
The Freshness Advantage
Freshly roasted coffee peaks somewhere between 24 hours and 3 days after roasting and stays genuinely excellent for about two weeks. When you roast at home with Verden green beans, you're always working with coffee that's hours off the roaster — not months. The difference in the cup is dramatic. People who roast their own coffee often say they can't go back. Not because they're snobs, but because once you've tasted it, it's hard to un-taste it.
The Cost Advantage
Green coffee beans typically cost 40–60% less per pound than equivalent quality roasted coffee. The Verden Ethiopian or Guatemalan greens that would retail at $20–25/lb roasted often run $8–12/lb as green beans. Add in the weight factor: coffee loses about 15–20% of its mass during roasting, so you’re paying for less of what you actually drink when you buy pre-roasted. When you buy green from Verden, you control every ounce.
The Control Advantage
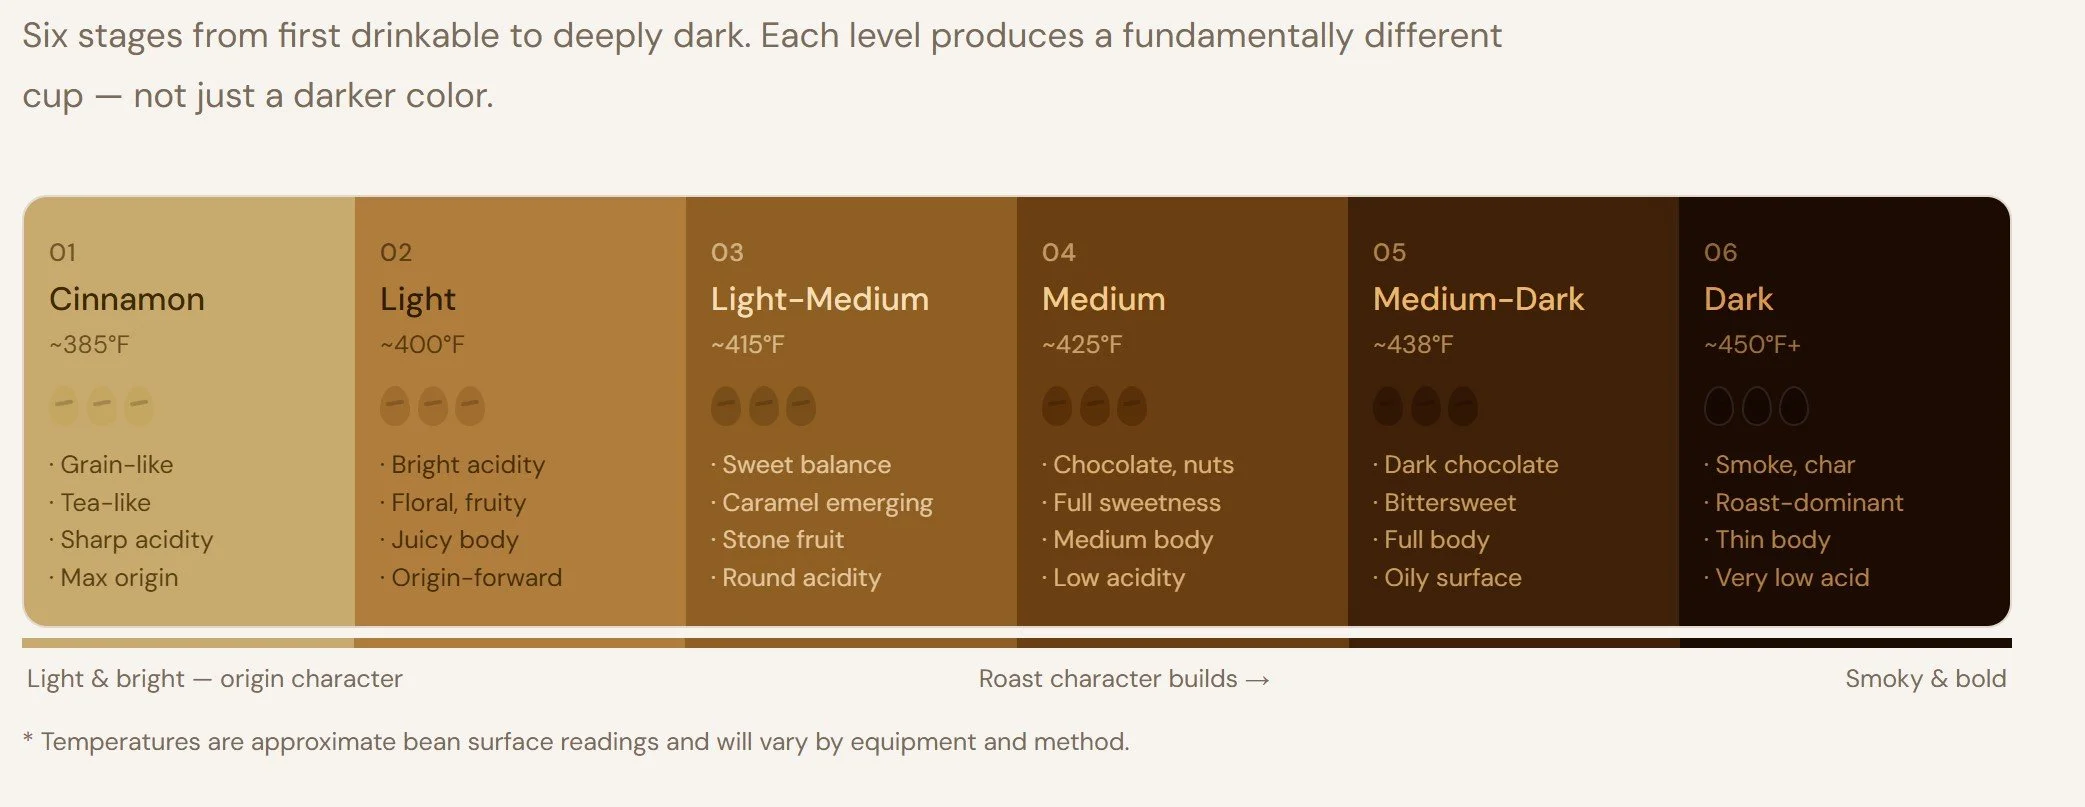
Roasting your own coffee means you decide how it tastes. The same bean roasted to different levels produces radically different cups. An Ethiopian roasted light preserves natural blueberry and jasmine notes. Take it dark and those delicate notes get replaced by smoke and bitterness. Neither is wrong — but knowing the difference and being able to choose it? That's the whole point.
The Process Is Simpler Than You Think
At its core, coffee roasting is heat + agitation + time. You apply heat to green beans while keeping them moving, you listen and watch for specific sensory cues, and you stop when you reach your target. A full roast takes 10–16 minutes. You don't need special equipment to start — a hot-air popcorn popper works beautifully.
The learning curve is real, but it's not steep. Most people produce genuinely good coffee on their second or third roast. By their tenth, they're producing coffee they'd put up against anything from a specialty café.
2. What You Need to Get Started
One of the best things about home roasting is how low the barrier to entry is. You can start with equipment you may already own and spend less than $5 on your first batch of green coffee.
Green Coffee Beans
Green coffee is simply unroasted coffee. It looks and smells nothing like roasted coffee — it's pale gray-green, dense, and smells faintly grassy. That transformation into the coffee aroma you love happens entirely in the roasting process.
A few pointers for getting started:
Start with a single-origin bean from a forgiving region. Colombian, Guatemalan, and Brazilian beans are particularly beginner-friendly — they have wide roast windows and don't require precision timing.
Order 1–2 lbs. to start. You'll likely run a few experimental batches, and green coffee keeps for 12–18 months in a cool, dry, dark spot.
Avoid blends early on. Single-origin beans let you learn what your process is doing without extra variables.
Equipment Options
There are four main ways to roast at home. Here's an honest look at all four:
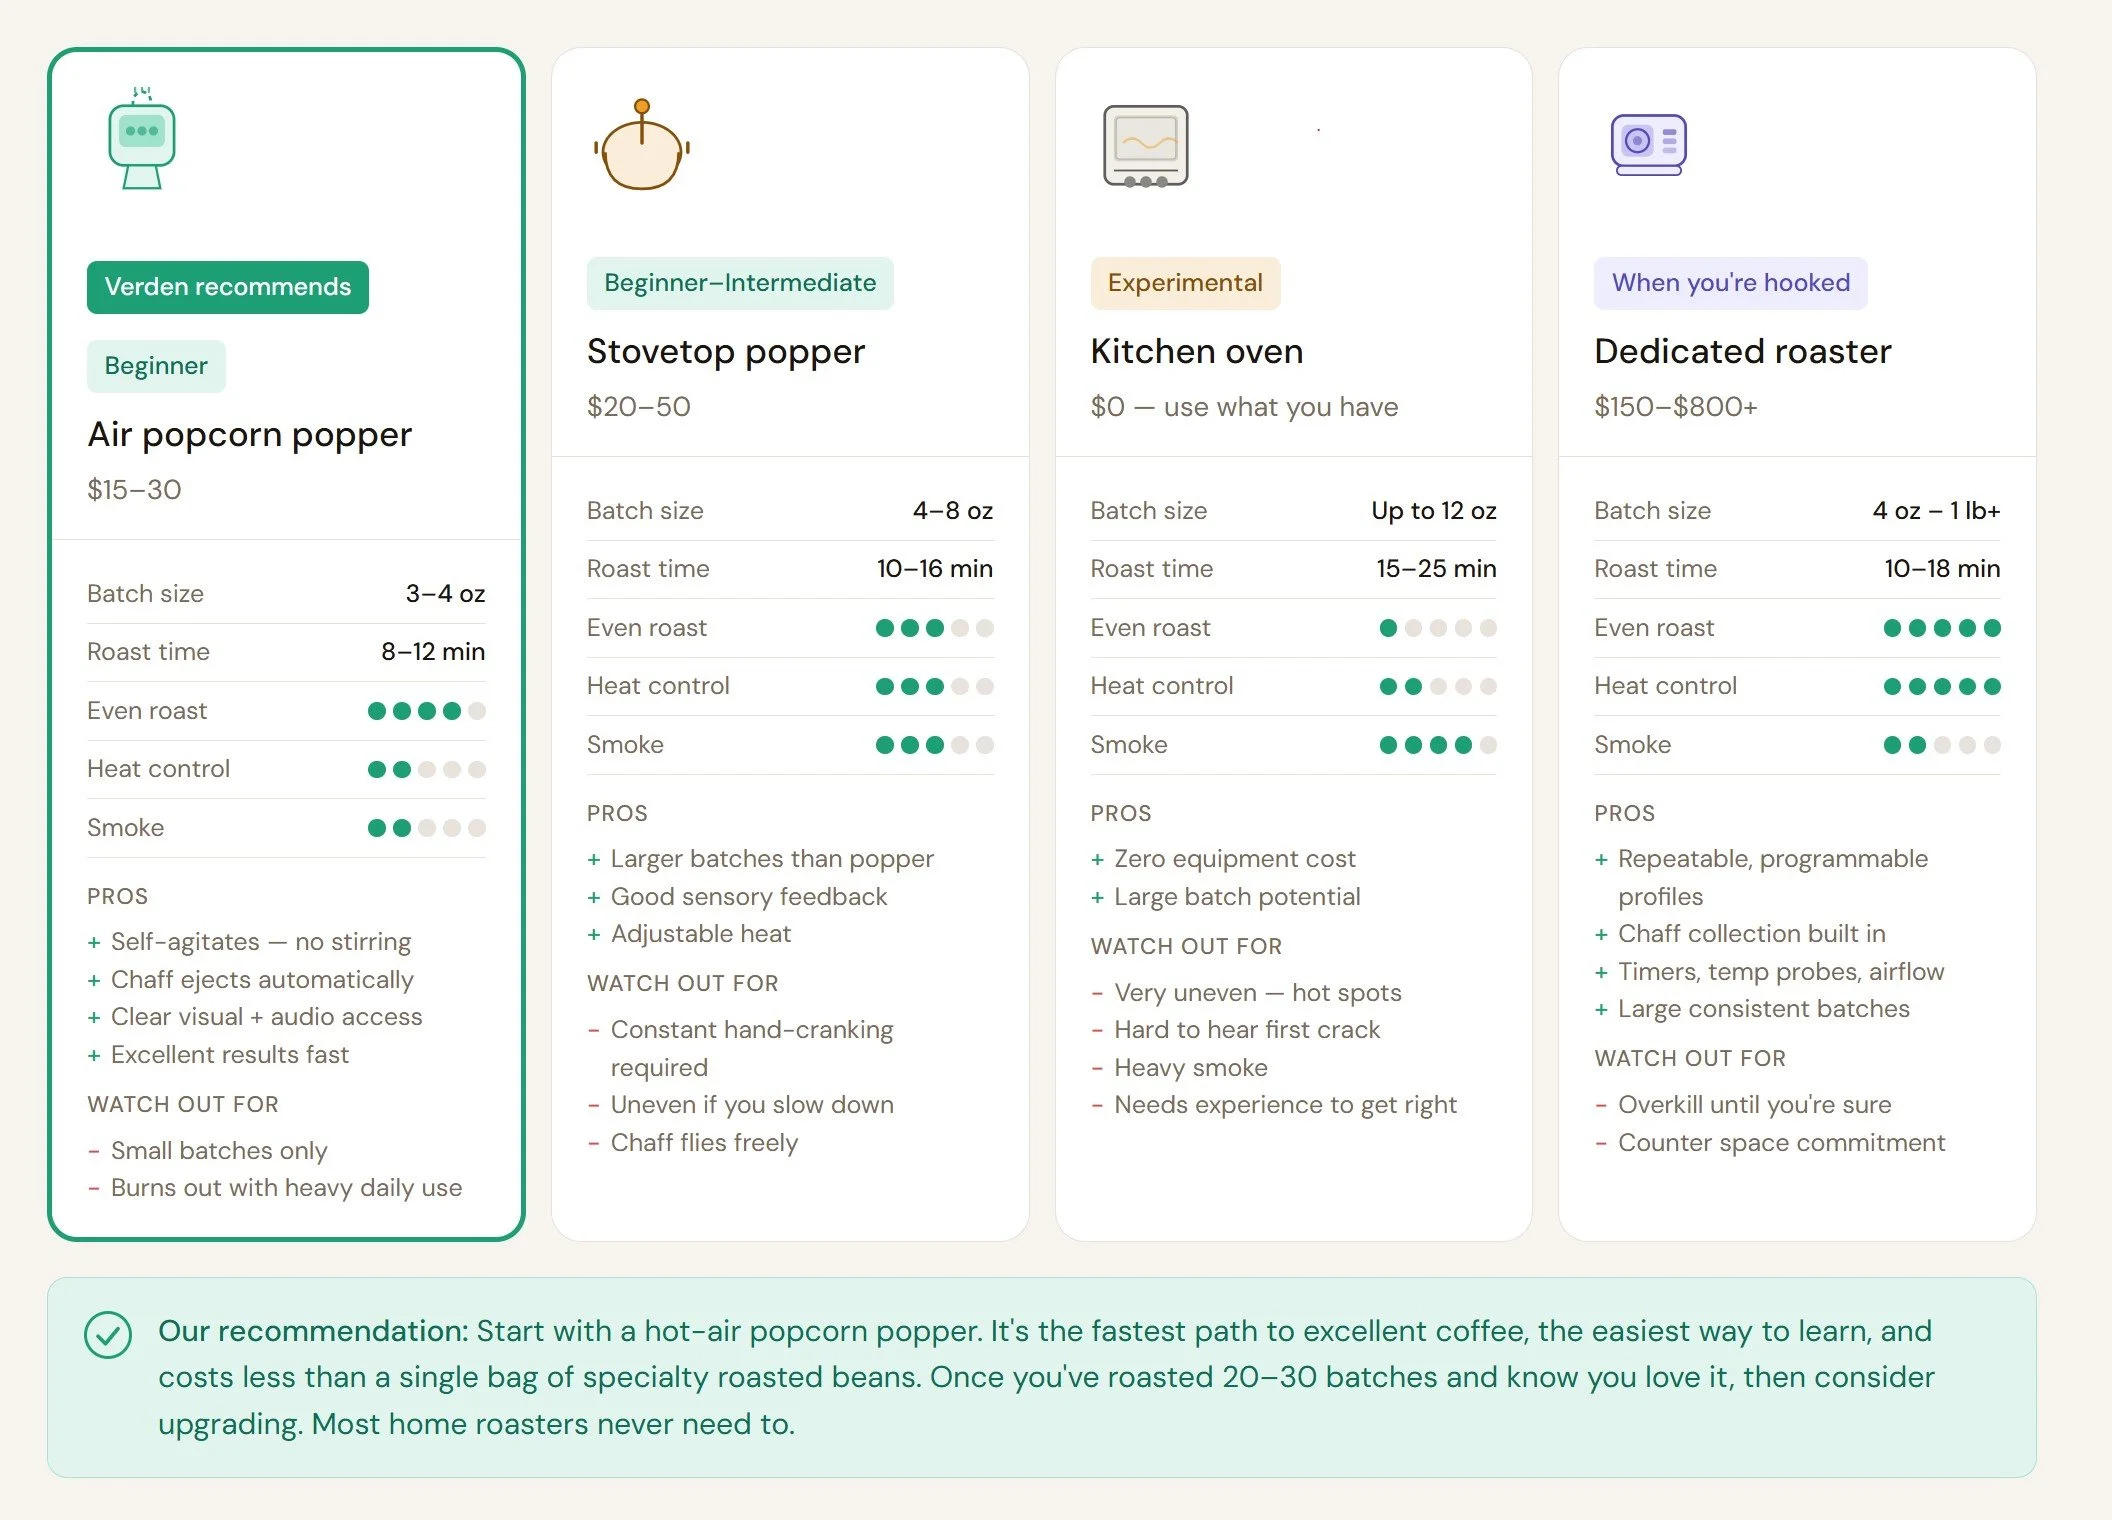
Our strong recommendation for beginners: start with a hot-air popcorn popper. It's cheap, produces a remarkably even roast, and ejects chaff automatically. Graduate to more sophisticated equipment once you know what you're trying to achieve.
Ventilation
Coffee roasting produces real smoke, especially in the later stages. It will set off your smoke alarm and coat your kitchen if you're not careful. The easiest solution: roast outside on a porch or in a garage. If you must roast indoors, use your range hood on high, open a window, and temporarily disable your smoke detector — and remember to turn it back on.
Cooling Equipment
You need to cool beans rapidly at the end of the roast. If you let them sit in residual heat, they keep developing — this is called carry-over roasting, and it's why beginners' beans often come out darker than intended. The solution: have two metal colanders ready. Transfer beans between them in the air, shaking vigorously, for 2–3 minutes. A small fan accelerates this significantly.
Optional But Helpful
Instant-read thermometer — for tracking bean surface temperature and calibrating your process.
Kitchen timer — track elapsed roast time from the moment you add beans.
Roast log notebook — write down date, bean origin, batch weight, roast time, crack observations, and tasting notes 48 hours later. This is how you improve.
Small flashlight — helpful for checking bean color in the popper.
3. The Roasting Process — Stage by Stage
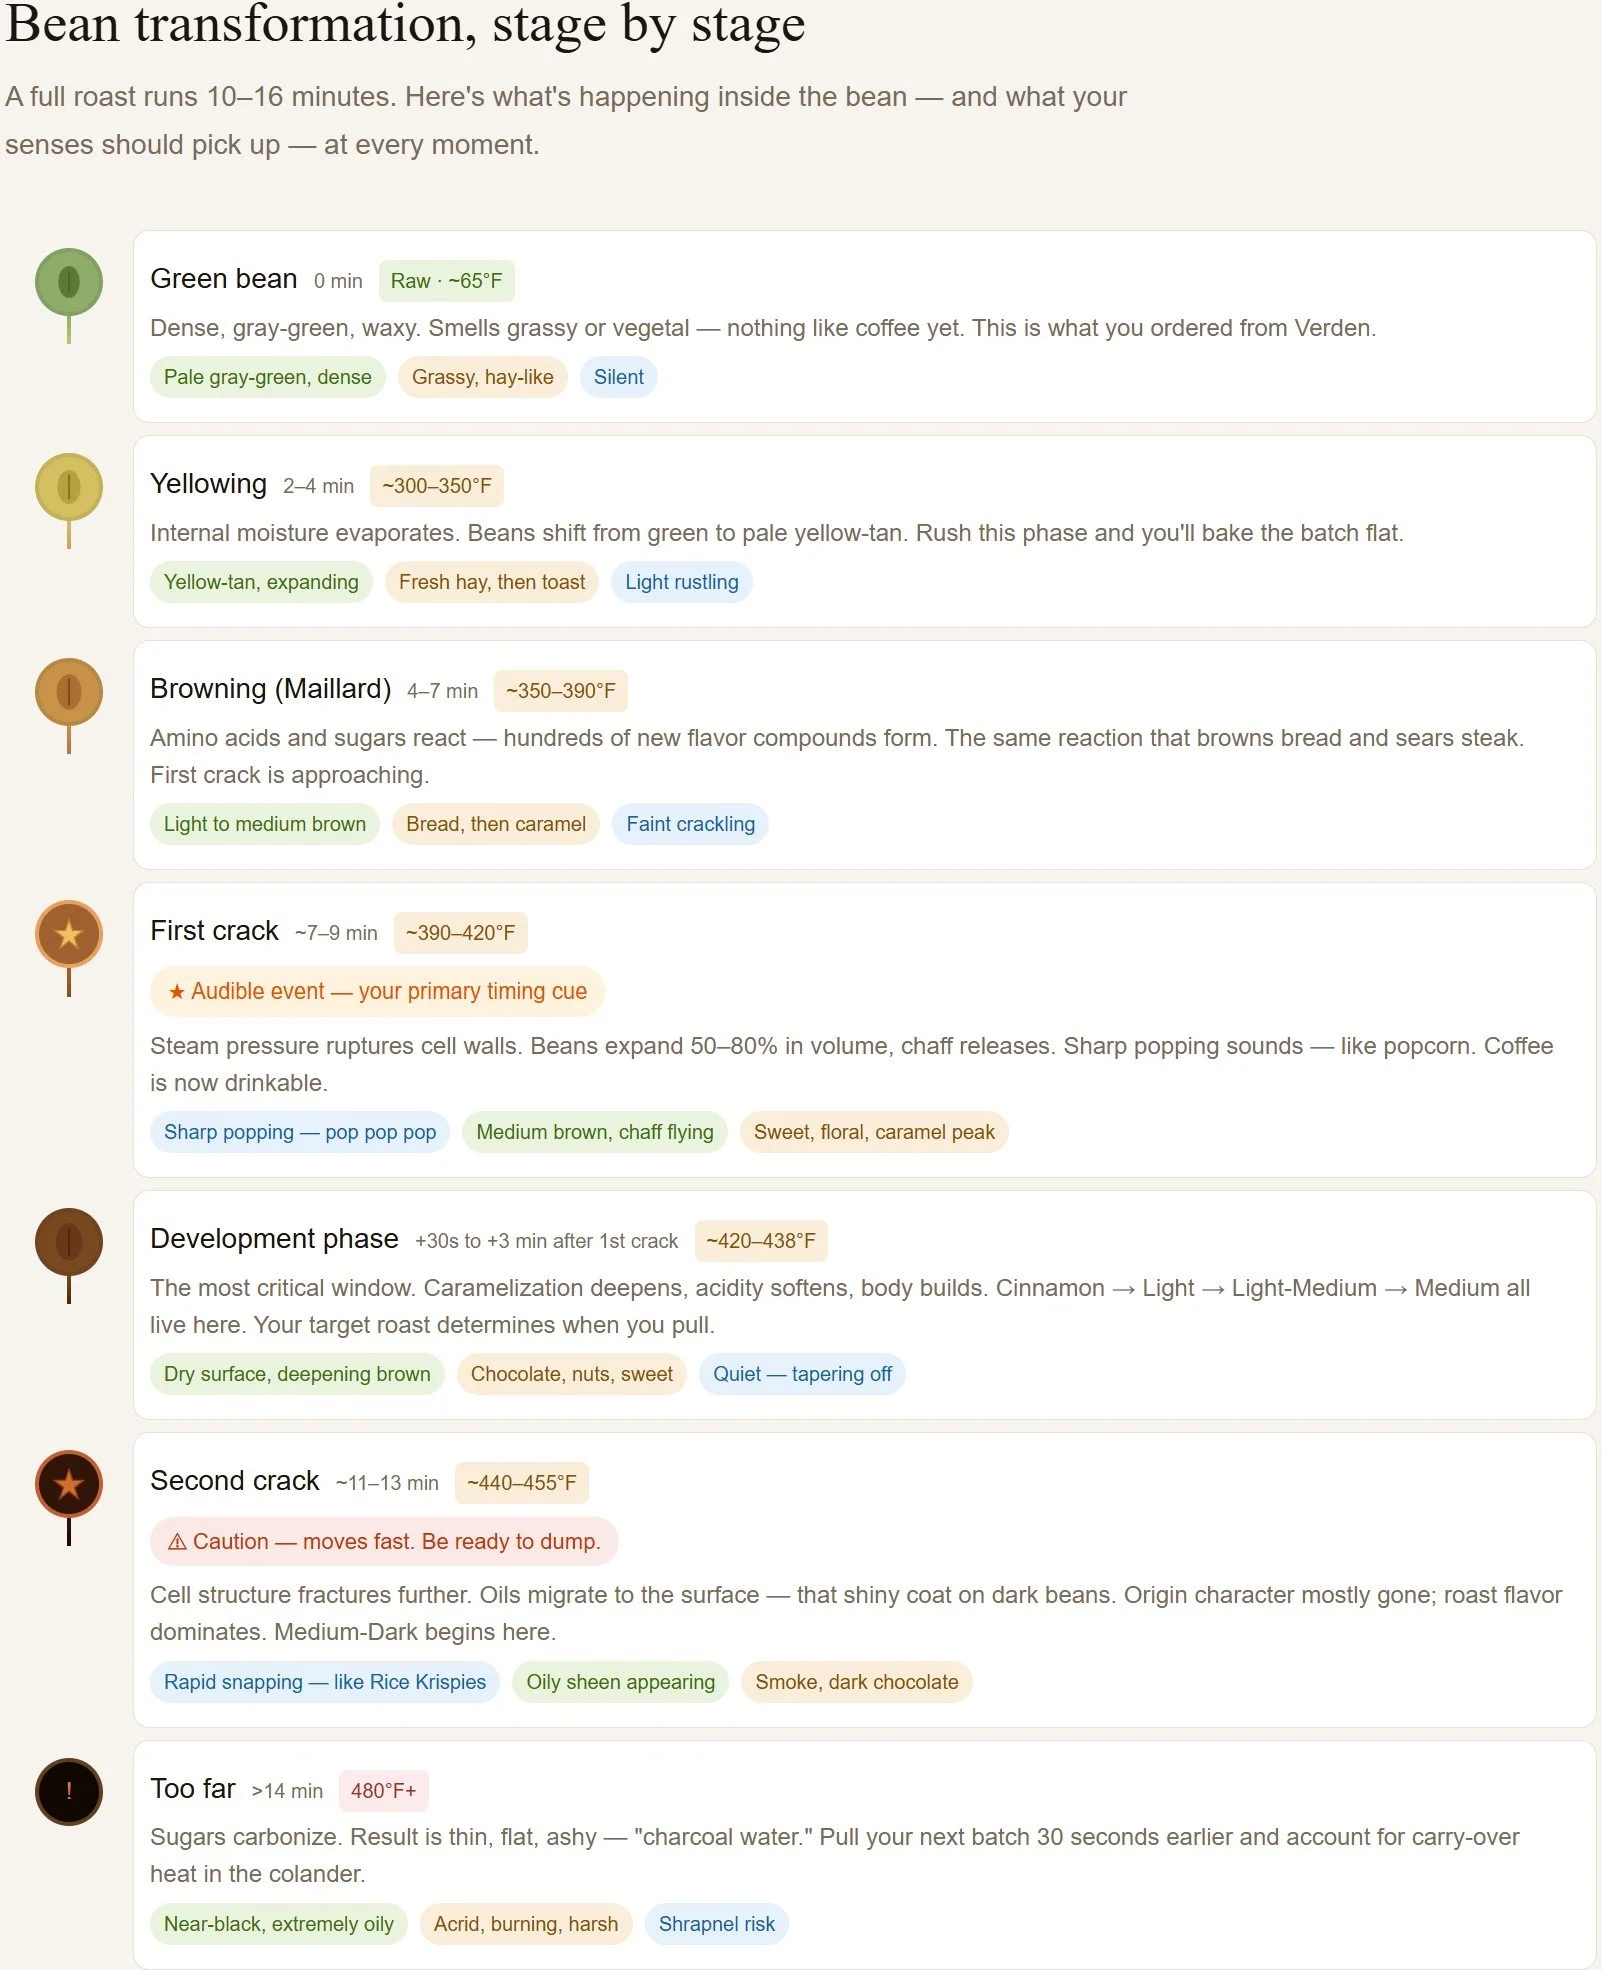
Understanding what's happening inside the bean at every moment is what separates someone who improvises from someone who roasts intentionally. A typical home roast runs 10–16 minutes — within that window, your coffee undergoes more chemical transformation than almost any other food process.
Stage 1: The Drying Phase (0–4 minutes)
Green coffee beans contain 10–12% moisture by weight. Before any browning or flavor development can happen, that moisture needs to evaporate. During this phase your beans stay green, then shift to pale yellow-green. The smell is grassy, like fresh-cut hay. No crack, no drama — just heat doing invisible work.
Important Don't Rush the Drying Phase: Resist the urge to blast heat from the start. A measured, even approach through the first 3–4 minutes sets up everything that follows. This is especially important with dense, high-altitude beans that carry more moisture.
Stage 2: The Browning / Maillard Phase (4–7 minutes): As moisture leaves the bean and temperature climbs, the Maillard reaction kicks in — the same reaction that browns bread and sears steak. Hundreds of new flavor compounds form. You'll see beans shift from yellow to tan to light brown, and the aroma changes from grassy to bready to toasty. First crack is approaching.
Stage 2: The Browning / Maillard Phase (4–7 minutes)
As moisture leaves the bean and temperature climbs, the Maillard reaction kicks in — the same reaction that browns bread and sears steak. Hundreds of new flavor compounds form. You'll see beans shift from yellow to tan to light brown, and the aroma changes from grassy to bready to toasty. First crack is approaching.
Stage 3: First Crack (~7–10 minutes)
First crack is an audible event — a series of sharp snapping sounds, like popcorn popping. Steam pressure inside the bean has built up enough to physically rupture the cell walls. Beans expand in volume by 50–80%. Chaff releases and blows off. Coffee is now technically drinkable, but not yet developed.
Key Chase the Sound, Not the Number: First crack typically occurs between 390–420°F, but don't chase a thermometer reading. Every machine, bean, altitude, and humidity level shifts those numbers. Your senses are more reliable than any thermometer.
Stage 4: The Development Phase (post-first crack)
After first crack, you enter the development phase — the most critical and nuanced part of the roast. Caramelization deepens, acidity softens, body builds. This is where your target roast level lives.
Stage 5: Second Crack (approaching dark territory)
If you continue past Medium-Dark, you’ll enter second crack — a different sound from the first. Quieter, more rapid, sharper, like Rice Krispies in milk. Oils locked inside the bean begin migrating to the surface — that's why dark-roasted beans look shiny. Origin character is largely gone at this point.
Caution Second Crack Moves Fast
The gap between Medium-Dark and Dark is seconds, not minutes. Once you hear second crack begin, be at the roaster and ready to act. Carry-over development continues 30–60 seconds after you remove the beans from heat.
4. Using Your Senses
Thermometers are helpful. Timers are useful. But your ears, eyes, and nose are the most reliable roasting instruments you have. Every machine transfers heat differently, every bean has different density and moisture, and environmental factors shift the numbers every session. What doesn't shift is the relationship between what you perceive and what's actually happening in the bean.
Sound: Your Most Reliable Indicator
The acoustic events of roasting — first crack and second crack — are universally reliable benchmarks. They don’t depend on equipment calibration.
First crack sounds like popcorn: sharp, somewhat loud, with a definite “pop” quality. Individual cracks are distinguishable early; they blur together at peak intensity.
Second crack sounds like Rice Krispies: more rapid, lighter, almost whispery. It can sneak up on you. If first crack is a knock, second crack is a tap.
The silence between them is significant. Counting seconds from the end of first crack gives you a reliable proxy for roast level without any other data.
Sight: Color as Secondary Benchmark
Color is your second-most-reliable indicator. Try to evaluate color in consistent lighting conditions — a bean that looks Medium-Dark under warm incandescent light might read as Medium in daylight. Many experienced roasters keep a reference sample from a roast they know to compare against.
Smell: Your Early Warning System
Smell is your earliest indicator and predicts crack timing before any visible change. Learn the progression:
Green / grassy (drying): smells like cut grass or fresh hay. You’re still a long way from coffee.
Bread / toast (early Maillard): warm, yeasty, like fresh bread. The reaction has started.
Caramel / sweet (approaching first crack): the sweetest point of the roast. First crack is near.
Chocolate / nutty (Medium): warm, round, familiar. The aroma most people associate with coffee.
Smoky / acrid (Dark): when it smells like something burning — because something is.
Key Insight Combine All Three Senses
Sound gives you the timeline. Sight confirms what sound is telling you. Smell provides nuanced depth neither of the others can. When all three align — you hear first crack ending, you see medium-dark dry beans, and you smell chocolate — you can pull with confidence.
5. The Popcorn Popper Method — Step by Step
The hot-air popcorn popper is the best way to learn coffee roasting. It’s inexpensive, produces a remarkably even roast (the hot-air circulation agitates beans continuously without any effort from you), and gives you clear sensory feedback at every stage.
What you need: a hot-air popcorn popper, 3–4 oz of Verden green beans, two metal colanders, and ventilation. A timer and notebook are optional but strongly recommended.
Before You Start
Weigh your green beans. 3 oz (85g) is a good starting batch for most air poppers. Too little and beans don’t agitate properly; too much and they can’t circulate.
Pre-examine your beans. Remove any obviously defective beans: blackened, broken, or substantially different in size. These roast at different rates.
Set up your cooling station. Place one colander next to the popper, second one ready for tossing. Position a fan if you have one.
Start your timer when you add beans to the popper, not when you turn it on.
The Active Roast
Turn on the popper and add beans immediately. Never pre-heat an empty popper — it can overheat and scorch beans on contact.
Watch for movement. Beans should be circulating in the airstream. If any are stationary, give the popper a gentle shake.
Listen for first crack. In most home poppers, first crack arrives between 3–5 minutes. This is your primary cue.
Decide your endpoint. For Light: dump within 30 seconds of first crack ending. For Light-Medium or Medium: develop 30–90 seconds beyond that. For Medium-Dark or darker: listen for second crack approaching.
The Dump and Cool
Dump at your target. Tilt or remove the lid and pour beans into your first colander quickly and decisively — hesitation means continued roasting from residual heat.
Toss immediately. Pour beans from one colander to the other in a steady arc. Do this rapidly and continuously for 2–3 minutes.
Test for heat. When you can hold beans in your palm for 5 seconds without discomfort, they’re sufficiently cool.
Don’t seal the container immediately — beans need to off-gas CO₂ for the first 12–24 hours.
Log your roast. Batch weight in and out, total roast time, time to first crack, time from first crack to dump, estimated roast level, observations.
Safety Never Leave It Unattended: Beans and chaff are combustible at extreme temperatures, and an overfilled or blocked popper can overheat quickly. Keep a small bowl of water nearby. Always roast in a well-ventilated area or outdoors.
6. After the Roast — Resting & Storage
You’ve just finished your roast. The beans are cooling, they smell incredible, and every instinct is telling you to brew immediately. Resist this urge.
Degassing: Why You Need to Wait
During roasting, coffee beans produce large amounts of CO₂. Much of this remains trapped inside the bean’s porous structure when you dump. If you brew immediately, two things happen:
CO₂ escaping from grounds during brewing interferes with water absorption, leading to uneven extraction and hollow flavor.
Volatile aromatic compounds are still in flux — some haven’t settled into their final form. The coffee tastes sharp, rough, sometimes almost vegetal.
Let your beans rest at room temperature, loosely covered, for at least 12 hours. For most coffees, the sweet spot is 24–48 hours post-roast.
Storage: The Four Enemies of Fresh Coffee
Coffee's four enemies are oxygen, moisture, heat, and light. The rules for good storage are essentially the rules for excluding all four.
Oxygen: Causes oxidation and flat flavors. Use the coffee within a week of opening a container.
Moisture: Accelerates staleness. Don’t store beans above the sink or dishwasher.
Heat: Accelerates all chemical reactions. Room temperature is fine — just not near the oven.
Light: Breaks down flavor compounds. Opaque containers are better than clear ones.
Best practice: use an airtight container with a one-way degassing valve. Grind only what you need, immediately before brewing — pre-ground coffee stales approximately 20x faster than whole bean.
7. Troubleshooting Common Problems
Every home roaster hits problems. The good news is that roasting defects fall into predictable categories — and once you understand the root cause, the fix is usually obvious. Resist the impulse to blame the beans. Roasting defects are almost always process problems.
Sour or Grassy Taste
Cause: Underdevelopment. Sugars haven't fully caramelized and chlorogenic acids are still intact.
Fix: Add 30–60 seconds of development time. Make sure you’re hearing first crack clearly and giving it at least 30–45 seconds after the crack subsides before pulling.
Flat, Baked, or Hollow Taste
Cause: A roast that took too long at too low a temperature. The chemical reactions proceeded too slowly.
Fix: Increase heat earlier, or reduce batch size. A well-executed roast should complete in 10–16 minutes. Beyond 18 minutes, the heat is too low.
Burnt, Bitter, or Harsh Taste
Cause: Over-roasted. Complex flavor compounds have broken down into simple, harsh, bitter ones.
Fix: Pull the beans earlier. Account for carry-over development — beans darken another 10–15 seconds worth in the colander after removing from heat.
Uneven Roast
Cause: Insufficient agitation or an oversized batch. Stationary beans in an air popper are a classic cause.
Fix: Reduce batch size. In stovetop methods, increase stirring frequency and move beans from center to edges and back.
8. Origin Pairings: Matching Bean to Roast Level
East African (Ethiopian, Kenyan, Rwandan): Roast light. These coffees carry extraordinary terroir character — berry, citrus, florals — that disappears under dark roasting. Light to Light-Medium is the sweet spot.
Central American (Guatemalan, Costa Rican, Colombian): Very flexible. Forgiving across a wide roast range. Great starting point for beginners.
South American (Brazilian, Peruvian): Often better with more development. Natural chocolate and nut character deepens nicely at Medium and beyond.
Indonesian (Sumatran, Javanese): Built for Medium-Dark to Dark. Dense, earthy, low-acid coffees that produce excellent espresso blends.
9. Your First 10 Roasts: A Progression Plan
Roasts 1–2: Roast the same Colombian or Guatemalan bean twice. Target Medium. Focus purely on hearing first crack clearly.
Roasts 3–4: Same bean, same target. Focus on color: compare your cooled beans against a reference.
Roasts 5–6: Same bean, experiment with levels. Pull one at Light, one at Medium-Dark. Brew and compare. Most educational exercise you can do.
Roasts 7–8: Try an Ethiopian or Kenyan bean. Roast to Light or Light-Medium. Taste the origin character.
Roasts 9–10: Roast your best-performing bean twice with one deliberate small change (20 more seconds of development). Cup side by side. Write down what changed.
You're Ready
By your 10th roast, you’ll have more practical knowledge about coffee flavor and development than most people accumulate in years of buying pre-roasted. Keep roasting, taste critically, adjust deliberately. Welcome to the craft.